Task: To use a remote MySQL database on FileMaker
The setup:
Client Side:
—————-
• FileMaker 12 Pro (though older versions can do this to)
• Mac OS Mountain Lion 10.7.5
Server Side:
—————-
Linux (Cent OS 6) – though this shouldn’t matter
MySQL 5.1.69 (this matters)
Server hosted on Amazon
The steps:
1. Preparing the server
1.1 Server port
1.2 MySQL database
You will need to set permissions in your MySQL database to allow access from outside, since by default access is restricted to localhost. The fastest way to do so is to use phpMyAdmin, open the record for the database you would like to use for Filemaker in mysql.db, paste in the IP of the machine that hosts your Filemaker in the “host” field and save as a new record. Do the same in mysql.user.
First trap: Your MySQL setup might use the old password encryption, which will later make the ODBC connection fail. If the encrypted password in your mysql.user.Password field is only 16 characters long, this will be case.
In that case, paste in the clear, unencrypted password in the Password field and select PASSWORD from the Function dropdown.
Don’t forget to run flush privileges; once you’re done with this part.
Once you are done with it, and given that mysql is installed on the machine that hosts Filemaker, it would be a good idea to test whether your Mysql and the server are properly setup.
Just run
1 | mysql -h YOURDOMAIN_OR_IP -u DATABASE_USERNAME DATABASE_NAME -p |
in Terminal, type in your password (given that you get that far) and see whether you can log in. If you can’t, then there’s something wrong already, so you should first see if the port is really open, MySQL user permissions are set etc.
2. Preparing the client
2.1 Getting the ODBC Connector
You can download the necessary ODBC connector from Mysql: http://dev.mysql.com/downloads/connector/odbc/5.2.html
However, this is where things can go horribly wrong. If you chose the wrong architecture (32-bit vs. 64-bit), things won’t work, but at least you will get an error message telling you that the architecture is wrong. My iMac is from 2012 and required 32-bit.
The version can also mess things up – unfortunately that’s more difficult to trap (connection in Filemaker works but can’t access tables etc – lots of unrelated error messages). On Mountain Lion I tried the Connector 5.1 first and got plenty of problems. Choosing 5.2 solved these issues.
This is how the connector needs to be installed:
2.1.1 download and unpack in Finder.
2.1.2 open terminal, type “cd ”
2.1.3 drag the lib folder from Finder to terminal and press enter
2.1.4 type
1 2 3 4 5 | sudo mkdir /usr/local/ sudo mkdir /usr/local/lib sudo cp * /usr/local/lib/ cd ../bin sudo ./myodbc-installer -a -d -n "MySQL ODBC 5.2 Driver" -t "Driver=/usr/local/lib/libmyodbc5a.so" |
(it doesn’t have to be /usr/local I assume, but it seems to be common to install it there, but this folder doesn’t exist by default on Mac). Be aware that you need to “sudo”, else it won’t work.
If successful, you should get a message saying something like:
Success: Usage count is 0
2.2 The ODBC Administrator
Until a few years ago, Mac OS shipped with an app called ODBC Administrator, residing in /Applications/Utilities, but it’s not included in the OS anymore since Lion. Or so.
However, the app can be downloaded here:
http://support.apple.com/kb/DL895
Installing the app is quick and easy – it will sit in the above-mentioned directory after that.
Some of the following lines are partially based on a comment by Marc Pope in this bug report. Kudos to Mark for this comment, which proved to be very helpful:
2.2.1 Launch the ODBC Administrator app and click the “Drivers” tab
2.2.2 Click the lock icon in the left bottom corner and type in your password
2.2.3 Click add, type in the description (everything will do) and the path and filename of the driver as set up in 2.1.4
2.2.4 You don’t need to specify a setup file – the system will do this for you
2.2.5 Set “Define as:” to System (else you can’t create System DSN’s, and Filemaker won’t accept anything else)
2.2.6 Click “OK” and “Apply”
2.3 Setting up a database source
2.3.1 In ODBC Administrator, click the “System DSN”
2.3.2 Choose the driver you’ve set up in 2.2 and click “OK”
2.3.3 Fill in your details as followed:
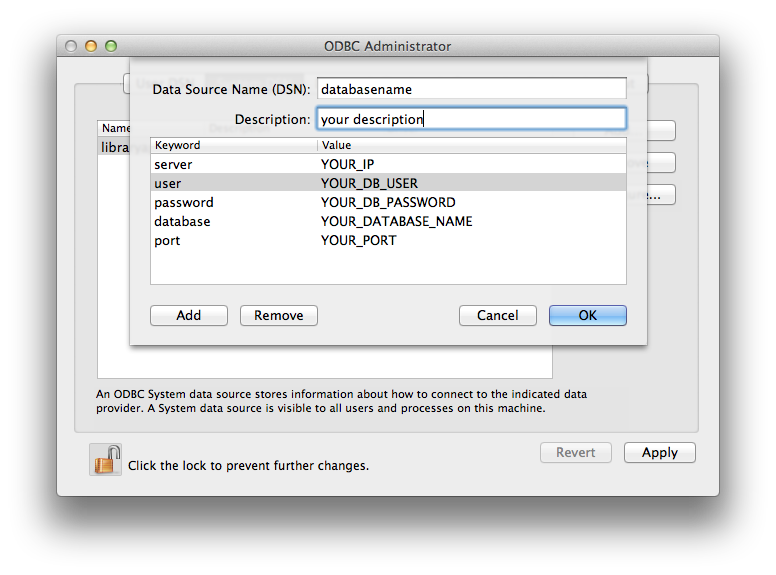 Note the following:
1) The data source name MUST be identical to the database name you want to connect to. However, the ODBC administrator only allows letters and numbers, but no underscore. If your database name contains underscores, type in a temporary name and go to 2.4 after completion
2) The UI is a bit sluggish – click on Keyword and wait a bit until it becomes editable – move ahead with tab to enter the value.
2.3.4 Save changes and exit
2.4 Fixing the underscore issue
If your MySQL database name contains underscores, you will have to do the following:
In Terminal, open the odbc.ini file that was created by the ODBC administrator, for example:
1 | sudo vi /Library/ODBC/odbc.ini |
and change the temporary name of your database (as typed in 2.3.3) to the proper name including the underscore. Note that there are 2 occurrences of the name (one of it in square brackets).
3. Filemaker
That was already to difficult part. The Filemaker part is straight forward and self explanatory.
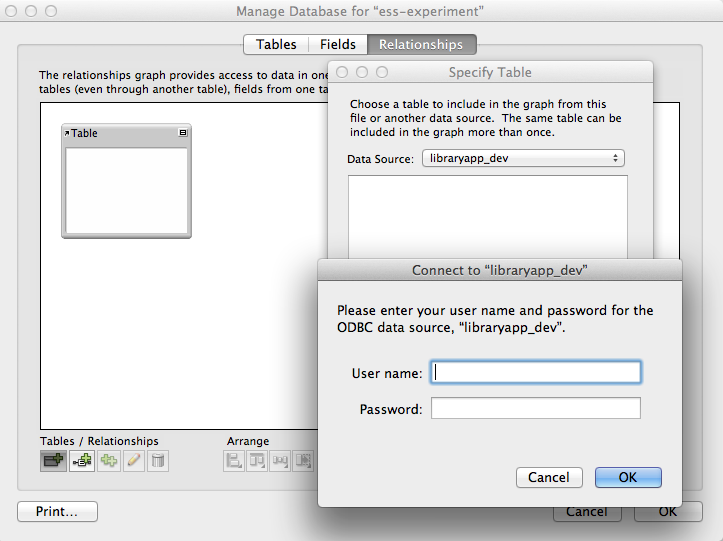
One way to add the new datasource is to go to
Manage>Database>Relationships
and click the “add table” button at the left bottom. In the popup menu “Data Source”, you can choose “Add ODBC data source…” and pick the source you have created in 2.3. You should get a list of your tables after confirming the DB username and password.
Bottom line: I was surprised by how smooth external database sources can be handled by Filemaker. But the way to get there is rather complicated, and really started to wonder, why Filemaker for example can’t include an easier method to enable ODBC connections. Instead, it’s wading through dozens of bug reports and cries for help to get there (it almost took me 3 hours to get where I wanted to get, but I guess it should only take 30 minutes or so if I had to repeat it. Given that the environment is the same.
Post a Comment
You must be logged in to post a comment.